
If you’re looking for a cute, crowd-pleasing treat to celebrate the new school year, these back to school cake pops are one of my favorite ideas. They’re playful, colorful, and surprisingly doable when you break the process into simple steps. I love making them for first-day celebrations, classroom parties, and little after-school surprises because they instantly make the table feel cheerful and special.
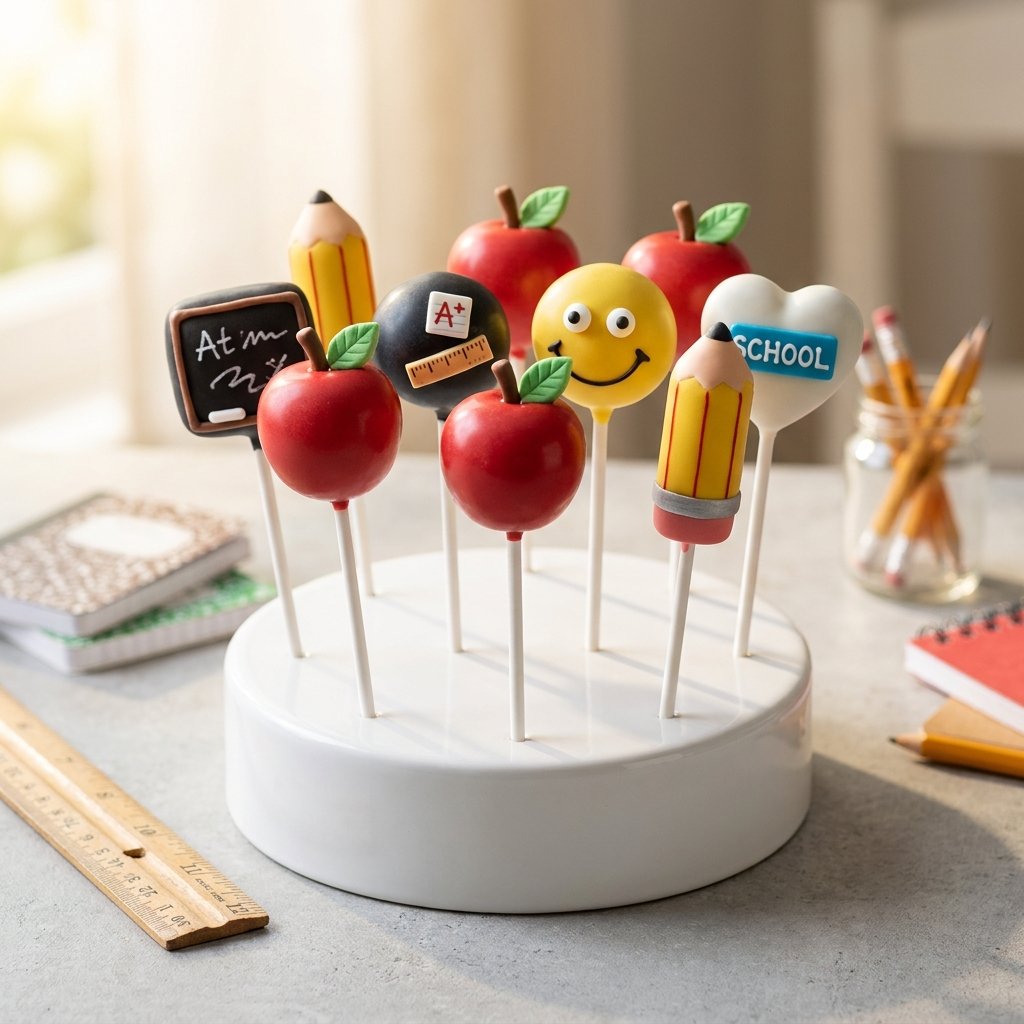
What makes these cake pops so fun is the school-themed decorating. You can turn them into bright pencils, shiny red apples, a little chalkboard, or simple round pops with smiley faces and easy candy details. You do not need to be a professional baker to make them look adorable, either. I’m going to walk you through the full process so you can feel confident from mixing the cake crumbs to dipping and decorating each pop.
If you’ve ever felt nervous about making cake pops, I completely get it. They can seem fussy at first, but once you know a few tricks, they become such a rewarding project. I’ll share the tips I use to keep the pops from cracking, sliding, or getting too heavy, so you can create a batch that looks festive and tastes just as good as it looks.
Quick Recipe Info Card
- Prep Time: 1 hour 15 minutes
- Cook Time: 30 minutes
- Total Time: 2 hours 30 minutes
- Servings: 20 cake pops
- Difficulty: Moderate
Why You’ll Love It
- Perfect for back-to-school parties, teacher gifts, and dessert tables.
- The school-themed decorations make them extra memorable.
- You can use boxed cake mix to keep things simple and approachable.
- They’re easy to customize with your school colors or favorite designs.
- Great make-ahead treat for busy weeks.
- Kids love helping with the decorating stage.
- Each pop is individually portioned, which makes serving easy and neat.
Nutritional Benefits and Adaptable Variations
- Portion-controlled treats can be easier to serve than slicing a full cake.
- You can use homemade cake or a boxed mix depending on your schedule.
- Try gluten-free cake mix and frosting if you need a gluten-free version.
- Use naturally colored decorations or simple chocolate drizzles for a less candy-heavy finish.
- Vanilla cake works beautifully, but chocolate, funfetti, or red velvet can also be used.
- For a teacher-gift version, keep the decorations simple with apples and pencils only.
- You can make a smaller batch by halving the ingredients and still follow the same method.
Ingredients
- For the cake pop base:
- 1 baked 9×13-inch vanilla or yellow cake, completely cooled
- 1/2 cup vanilla frosting, plus more only if needed
- For assembling:
- 20 lollipop sticks
- 12 ounces white candy melts
- 12 ounces yellow candy melts
- 8 ounces red candy melts
- 6 ounces black candy melts
- For decorating:
- Blue candy melts or royal icing for accents
- Green candy melts for apple leaves
- Brown candy melts or pretzel stick pieces for apple stems
- Mini candy eyes for smiley face pops
- White decorating icing for chalkboard details
- Yellow decorating icing for letter details
- Optional sprinkles or sanding sugar for extra texture
Step-by-Step Instructions
- Bake and cool the cake. Prepare your cake in a 9×13-inch pan according to package or recipe directions. Let it cool completely before starting. Warm cake will make the mixture too soft.
- Crumble the cake. Break the cooled cake into fine crumbs in a large mixing bowl. You want an even texture with no large chunks.
- Mix with frosting. Add 1/2 cup frosting and stir or mix with clean hands until the crumbs hold together when pressed. The mixture should feel moist but not sticky or greasy. Add a little more frosting only if needed.
- Shape the cake pops. Scoop and roll the mixture into 20 evenly sized balls. For pencil or apple designs, you can gently shape some into rounded ovals. Place them on a parchment-lined tray.
- Chill. Refrigerate the shaped cake balls for 1 hour, or freeze for 15 to 20 minutes, until firm.
- Prepare the sticks. Melt a small amount of candy melts. Dip the tip of each stick into the melted coating, then insert it halfway into each cake ball. This helps secure the pops. Chill again for 10 to 15 minutes.
- Melt the coatings. Melt the candy melts in separate bowls, one color at a time, according to package directions. Stir until smooth. If the coating is too thick, thin it with a little paramount crystals or a tiny bit of vegetable shortening made for candy work.
- Dip the pops. Dip each chilled cake pop into the melted coating, turning gently to cover fully. Tap off the excess carefully without banging too hard. Place upright in a cake pop stand or foam block to set.
- Create the pencil pops. Use yellow coating for the body, then add a pink eraser end and a small white tip with a dark point using additional melted candy. Let each color set before adding the next detail.
- Create the apple pops. Dip in red coating, then add a small green leaf and brown stem while the coating is still soft enough to attach decorations.
- Create the chalkboard and school icon pops. Use black coating for chalkboard-style or round pops. Pipe white ABC details, yellow letters, check marks, or other school-themed accents after the coating has set.
- Finish the smiley pops. Add candy eyes to yellow-coated pops while still wet, then pipe a simple smile once set.
- Let everything set completely. Allow the decorated pops to dry fully before serving, packaging, or storing.
Tips, Serving Suggestions & Substitutions
- Do not add too much frosting. That is the most common reason cake pops become too soft or slide down the sticks.
- If your cake balls crack after dipping, they may be too cold compared to the warm coating. Let them sit at room temperature for a few minutes before dipping.
- Work with one color of candy melts at a time so the coating stays smooth and fluid.
- For easier decorating, keep some pops round and use school-inspired colors and piped details instead of complex shapes.
- Serve these on a dessert board with cookies, fruit, and mini cupcakes for a fun back-to-school spread.
- Wrap individual pops in treat bags and tie with ribbon for party favors or teacher gifts.
- You can swap vanilla cake for chocolate cake if you want richer flavor under the colorful coating.
- If you do not have candy melts in every color, start with white coating and tint small amounts with oil-based candy color.
Nutrition Information
| Nutrient | Approximate Amount Per Pop |
|---|---|
| Calories | 210 |
| Carbohydrates | 29 g |
| Protein | 2 g |
| Fat | 10 g |
| Saturated Fat | 6 g |
| Cholesterol | 18 mg |
| Sodium | 145 mg |
| Fiber | 0 g |
| Sugar | 22 g |
Nutrition values are estimated and can vary depending on the cake, frosting, candy coating, and decorations you use.
Storage & Make-Ahead Tips
Store finished cake pops in an airtight container in the refrigerator for up to 5 days. For the best texture, let them sit at room temperature for about 15 to 20 minutes before serving. If you are making them ahead for a party, you can bake the cake a day in advance and keep it tightly wrapped until ready to crumble and mix.
You can also shape the cake balls ahead of time and chill them overnight before dipping. Fully finished cake pops can be packaged individually once completely set. If you need longer storage, freeze the undecorated cake pop centers in a well-wrapped container for up to 1 month, then thaw in the refrigerator before dipping. Always keep dairy-based cake pops properly chilled if they are not being served right away.
FAQ
1. Why are my cake pops falling off the sticks?
You may have added too much frosting, making the centers too soft. It also helps to dip the stick in melted candy before inserting it into the cake ball.
2. Can I use boxed cake mix for these back to school cake pops?
Yes, absolutely. Boxed cake mix works very well here and is a great time-saver.
3. How do I get smooth candy coating?
Make sure the coating is fully melted and fluid. If it seems too thick, thin it carefully with a candy-safe thinning product or a very small amount of vegetable shortening.
4. Can I make these a day or two in advance?
Yes. They’re a great make-ahead dessert and keep well in the refrigerator for several days.
5. What’s the easiest design for beginners?
Simple round pops decorated with smiley faces, letters, or apple-inspired colors are the easiest place to start.
Final Thoughts
I really love how these back to school cake pops bring so much personality to a simple dessert. They feel festive, creative, and thoughtful, and they’re one of those treats that make kids light up the moment they see them. Whether you go all out with pencil and apple designs or keep things easy with colorful round pops, you’ll end up with something charming and celebration-worthy.
If you make them, I’d love to hear how they turned out for you. Feel free to leave a comment with your favorite design, share the recipe with a friend, and save it to Pinterest so you can come back to it every school season.
Back To School Cake Pops Tutorial - Moms & Munchkins
Ingredients
Equipment
Method
- Bake the cake in a 9x13-inch pan according to package or recipe directions, then cool completely.
- Crumble the cooled cake into fine crumbs in a large mixing bowl.
- Mix in the vanilla frosting until the crumbs hold together when pressed. Add only a little extra frosting if needed.
- Roll the mixture into 20 even balls, shaping a few gently into rounded ovals if desired for pencil or apple designs.
- Place the cake balls on a parchment-lined tray and refrigerate for 1 hour or freeze for 15 to 20 minutes until firm.
- Melt a small amount of candy melts. Dip the tip of each lollipop stick into the melted coating, then insert it halfway into each cake ball.
- Chill the pops again for 10 to 15 minutes to help secure the sticks.
- Melt the white, yellow, red, and black candy melts in separate microwave-safe bowls according to package directions, stirring until smooth.
- Dip each chilled cake pop into the coating of your choice, turning gently to cover fully. Tap off the excess and place upright in a stand or foam block to set.
- For pencil pops, use yellow coating for the body, then add a pink eraser end, a white sharpened section, and a dark tip with additional melted candy.
- For apple pops, coat in red candy melts and add a small green leaf and brown stem while the coating is still soft enough to attach decorations.
- For chalkboard or school icon pops, use black coating or round pops and pipe white ABC details, yellow letters, blue check marks, or similar accents after the coating sets.
- For smiley face pops, add candy eyes to yellow-coated pops while still wet, then pipe a simple smile once set.
- Let all decorated pops set completely before serving or storing.
