
If you’re looking for cheerful, creative back to school cookies that turn an ordinary baking day into a memory-making activity, these Colorful School Supplies Cookies for Family Fun are such a joy to make. I love recipes like this because they’re not just about the final treat—they’re about sitting at the table together, rolling dough, mixing bright icing colors, and laughing over which cookie shape comes out cutest.
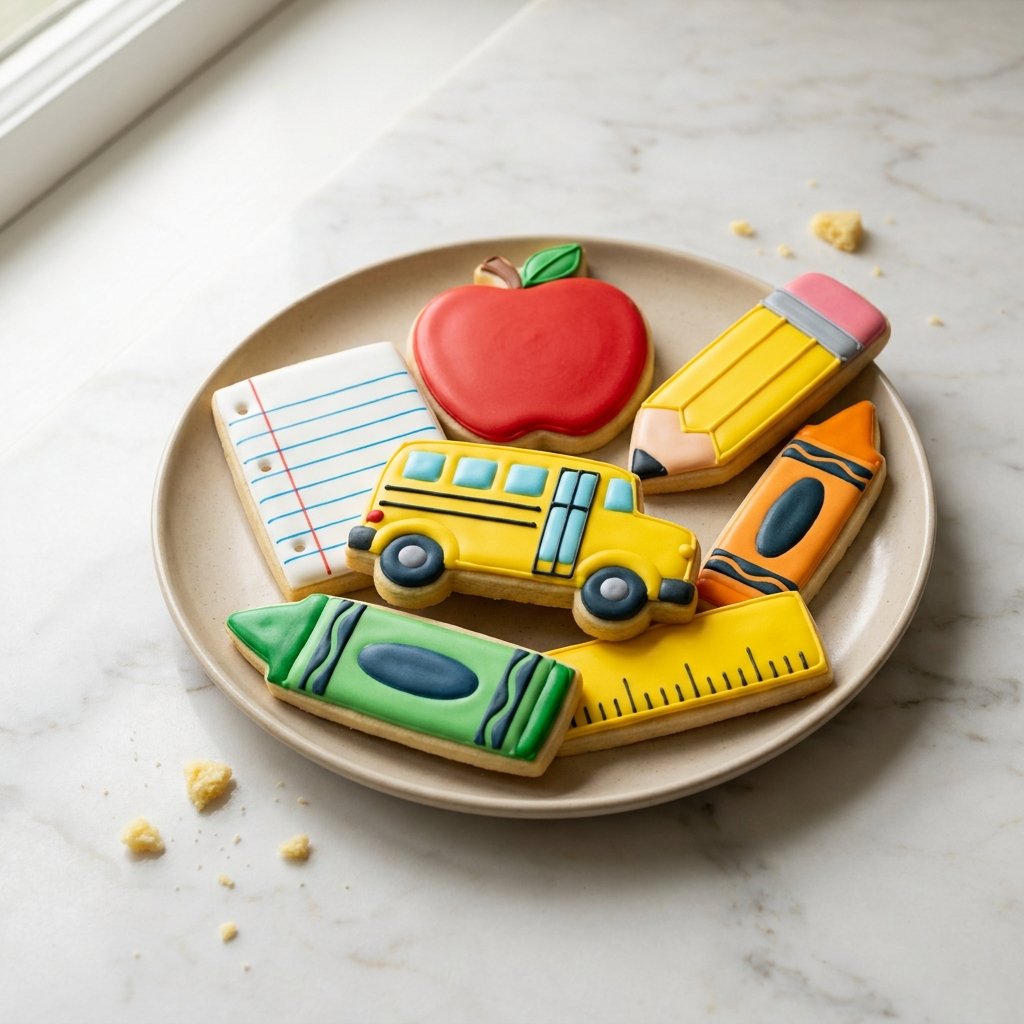
These cookies are inspired by all the classic school-day favorites: pencils, apples, notebooks, rulers, crayons, and even a little school bus. They start with a buttery sugar cookie base that bakes up sturdy enough for decorating, then get finished with smooth royal icing in bright, playful colors. The result is a batch of cookies that looks impressive, but is still completely doable at home.
I especially love making these with kids before the first day of school, for teacher appreciation gifts, or for a fun family weekend project. You can go all-out with details or keep the designs simple and still end up with adorable cookies that feel festive, thoughtful, and homemade.
Quick Recipe Info Card
- Prep Time: 45 minutes
- Cook Time: 10 minutes
- Total Time: 115 minutes
- Servings: 24 cookies
- Difficulty: Intermediate
Why You’ll Love It
- These cookies are bright, playful, and perfect for back-to-school celebrations.
- The sugar cookie dough holds its shape beautifully for themed cookie cutters.
- Royal icing creates a smooth, polished finish with bold, vivid color.
- You can decorate them simply or get detailed depending on your time and mood.
- They make adorable treats for lunchbox surprises, class parties, and teacher gifts.
- This recipe is a fun family project that lets everyone join in.
- The cookies can be made ahead, which makes party prep easier.
Nutritional Benefits and Adaptable Variations
- Portion-friendly treat: These cookies are individually sized, which makes serving easy.
- Creative baking activity: Decorating encourages hands-on family time and can help kids practice fine motor skills.
- Customizable colors: Use your favorite school colors or a softer pastel palette if you prefer.
- Shape flexibility: If you don’t have school-themed cutters, use rectangles, circles, or apples and decorate them to match the theme.
- Flavor variation: Add almond extract or a touch of lemon zest to the dough for a different flavor profile.
- Simple design option: Skip intricate piping and use color blocking for easy but adorable results.
- Gluten-free adaptation: A reliable 1:1 gluten-free baking flour may work well in the cookie dough, though texture can vary by brand.
Ingredients
For the Sugar Cookies
- 1 cup unsalted butter, softened
- 1 cup granulated sugar
- 1 large egg
- 2 teaspoons vanilla extract
- 3 cups all-purpose flour
- 1 teaspoon baking powder
- 1/2 teaspoon salt
For the Royal Icing
- 4 cups powdered sugar
- 3 tablespoons meringue powder
- 6 to 8 tablespoons warm water, plus more as needed
- 1/2 teaspoon vanilla extract
For Decorating
- Gel food coloring in red, yellow, blue, green, and orange
- School-themed cookie cutters such as apple, pencil, notebook, ruler, crayon, and bus
Step-by-Step Instructions
- Make the dough: In a large mixing bowl, beat the softened butter and granulated sugar until light and fluffy. Mix in the egg and vanilla extract until fully combined.
- Combine the dry ingredients: In a separate bowl, whisk together the flour, baking powder, and salt.
- Finish the dough: Gradually add the dry ingredients to the butter mixture, mixing just until a soft dough forms. Avoid overmixing so the cookies stay tender.
- Chill the dough: Divide the dough into two discs, wrap well, and refrigerate for at least 30 minutes so it is easier to roll and cut.
- Prep for baking: Preheat your oven to 350°F. Line baking sheets with parchment paper.
- Roll and cut: On a lightly floured surface, roll the dough to about 1/4-inch thickness. Cut into school-themed shapes and transfer them to the prepared baking sheets.
- Bake: Bake for 8 to 10 minutes, or until the edges are just set and the tops look dry. Do not overbake if you want a softer bite and a lighter cookie color for decorating.
- Cool completely: Let the cookies rest on the baking sheet for 5 minutes, then transfer to a wire rack to cool completely before icing.
- Make the royal icing: In a clean bowl, beat the powdered sugar, meringue powder, warm water, and vanilla extract until smooth and glossy. Adjust with a little more water as needed to create piping and flood consistencies.
- Color the icing: Divide the icing into small bowls and tint with gel food coloring. Keep one portion white for notebook paper details and highlights.
- Outline the cookies: Transfer icing to piping bags or squeeze bottles. Pipe outlines on each cookie to match the shape design, such as a yellow pencil body, red apple, blue notebook, or orange crayon.
- Flood and decorate: Fill in each outlined section with slightly thinned icing. Use a toothpick or scribe tool to guide icing into corners and pop air bubbles. Add simple details like notebook lines, ruler marks, pencil tips, and bus windows once the base icing begins to set.
- Let the icing dry: Leave the cookies at room temperature until the icing is fully dry and set before stacking or packaging. This usually takes several hours, depending on humidity.
Tips, Serving Suggestions & Substitutions
- Roll the dough evenly so the cookies bake at the same rate and decorate neatly.
- If the dough softens too much while working, return it to the refrigerator for 10 to 15 minutes.
- For clean edges, use cookie cutters dipped lightly in flour between cuts.
- Gel food coloring works best because it gives vibrant color without making the icing too thin.
- If royal icing feels too thick, add water a few drops at a time. If it gets too thin, mix in a little more powdered sugar.
- For easier decorating with kids, make larger cookie shapes and use broad color sections instead of tiny details.
- These are lovely served on a dessert tray for a back-to-school party or packed in treat bags for teachers and friends.
- You can swap vanilla for part almond extract if you like a bakery-style sugar cookie flavor.
- If you do not want to use royal icing, a simple glaze can work, though the details may not look as crisp.
Nutrition Information
| Nutrient | Approximate Amount Per Cookie |
|---|---|
| Calories | 180 |
| Carbohydrates | 28 g |
| Protein | 2 g |
| Fat | 7 g |
| Saturated Fat | 4 g |
| Cholesterol | 22 mg |
| Sodium | 65 mg |
| Fiber | 0 g |
| Sugar | 18 g |
Nutrition values are estimates only and can vary based on cookie size, icing amount, and specific ingredients used.
Storage & Make-Ahead Tips
Store fully dried cookies in an airtight container at room temperature for up to 5 days. To prevent smudging, be sure the icing is completely set before stacking, and place parchment paper between layers if needed.
You can make the cookie dough up to 2 days in advance and keep it refrigerated. The baked undecorated cookies can also be made ahead and stored in an airtight container for 2 to 3 days before decorating. If you want to freeze them, freeze the undecorated cookies or the dough for best texture. Once decorated, freeze only if the icing is fully dry and the cookies are packed carefully in airtight layers.
For food safety, avoid storing cookies in a warm or humid place, and always use clean, dry containers for longer freshness.
FAQ
1. Can I make these back to school cookies without school-shaped cutters?
Yes, absolutely. Rectangles, circles, and squares work wonderfully. You can decorate simple shapes to look like notebooks, flashcards, apples, or mini chalkboards.
2. How long does royal icing take to dry?
It usually takes several hours at room temperature, and sometimes overnight for fully firm icing, especially in humid conditions. I like to decorate them earlier in the day and leave them uncovered to set.
3. Can kids help decorate these cookies?
Definitely. I recommend prepping the icing colors and outlining some sections first, then letting kids fill larger areas and add simple details. It’s a fun and manageable family activity.
4. Why did my cookies spread too much?
That usually happens if the dough is too warm or if there is too little flour. Chilling the dough before rolling and again after cutting, if needed, helps the shapes hold beautifully.
5. Can I package these as gifts?
Yes. Once the icing is fully dry, place the cookies in treat bags or bakery boxes. They make charming gifts for teachers, classmates, neighbors, or a first-day-of-school surprise.
Final Thoughts
These Colorful School Supplies Cookies for Family Fun are one of those recipes that brings a little extra excitement to the season. I love how they combine a classic sugar cookie with bright, happy decorating that feels special without being overly complicated. Whether you make them for a party, a teacher gift, or just an afternoon of family baking, they’re the kind of treat people remember.
If you try them, I’d love for you to leave a comment and share how your designs turned out. And if this recipe made your back-to-school season a little sweeter, please share it with friends and save it to Pinterest for later.
Colorful School Supplies Cookies for Family Fun
Ingredients
Equipment
Method
- In a large mixing bowl, beat the softened butter and granulated sugar until light and fluffy. Mix in the egg and vanilla extract until fully combined.
- In a separate bowl, whisk together the flour, baking powder, and salt.
- Gradually add the dry ingredients to the butter mixture, mixing just until a soft dough forms.
- Divide the dough into two discs, wrap well, and refrigerate for at least 30 minutes.
- Preheat the oven to 350°F and line baking sheets with parchment paper.
- On a lightly floured surface, roll the dough to about 1/4-inch thickness. Cut into school-themed shapes and transfer to the prepared baking sheets.
- Bake for 8 to 10 minutes, or until the edges are just set and the tops look dry.
- Let the cookies rest on the baking sheet for 5 minutes, then transfer to a wire rack to cool completely before decorating.
- In a clean bowl, beat the powdered sugar, meringue powder, warm water, and vanilla extract until smooth and glossy. Adjust with additional water as needed for piping and flood consistencies.
- Divide the icing into small bowls and tint with gel food coloring, keeping one portion white.
- Transfer icing to piping bags or squeeze bottles and pipe outlines on each cookie to match the design.
- Fill in each outlined section with slightly thinned icing. Use a toothpick or scribe tool to guide icing into corners and pop air bubbles. Add details like notebook lines, ruler marks, pencil tips, and bus windows once the base icing begins to set.
- Leave the cookies at room temperature until the icing is fully dry and set before stacking or packaging.
